

If you’re missing most or all of your teeth, the All-on-4 dental implant procedure can give you a full set of new teeth in just one day. This method uses four implants placed in your jaw to hold a complete arch of replacement teeth, offering a stable and lasting solution.
All-on-4 implants let you leave the dental office with fixed temporary teeth right after surgery, reducing downtime and helping you get back to your normal life quickly. The process is carefully planned to fit your unique needs, making it both effective and comfortable.
You’ll learn how this step-by-step process works, from your first visit and preparation to surgery, healing, and finally getting your permanent smile. Understanding what to expect will make your journey to a new set of teeth easier and less stressful.
Key Takeaways
- You get a full arch of teeth supported by just four implants.
- The procedure includes careful planning and quick recovery with temporary teeth the same day.
- Healing and follow-up care help make your new smile last for years.
Understanding All-on-4 Dental Implants
All-on-4 dental implants provide a fixed, full-arch solution that supports a complete set of teeth using only a few implants. This method offers comfort and stability while helping protect your jawbone.
It stands out by using fewer implants and providing benefits that go beyond traditional dentures. This makes it a smart choice if you want a long-lasting, natural-looking smile.
What Sets All-on-4 Apart
The All-on-4 technique uses four strategically placed implants to support a full arch of replacement teeth. Unlike traditional dental implants, which may require one implant per tooth, All-on-4 needs fewer implants, reducing surgery time and complexity.
The implants are often angled to make the most of your existing jawbone, usually avoiding the need for bone grafts even if you have low jawbone density. Because the implants are fixed permanently, your new teeth won’t slip or shift like traditional dentures can.
You’ll get strong support for chewing and speaking, which helps you feel confident. Clinical reviews report All-on-4 success rates ranging from 91.9% to 99.6%, showing that this approach delivers reliable outcomes when implants are placed strategically.
Many patients also receive temporary teeth the same day as surgery, allowing them to leave with a functional smile immediately.
Benefits Compared to Traditional Dentures
Traditional dentures rest on your gums and can move around, causing discomfort and difficulties with eating or talking. All-on-4 implants are anchored directly into your jawbone, which offers much better stability.
This means no adhesives are needed, and you won’t need to remove your teeth for cleaning. All-on-4 implants also help maintain your jawbone’s shape.
When teeth are missing, the bone underneath can shrink over time, making your face look older. The implants act like natural tooth roots, stimulating the bone and preventing this loss.
You’ll enjoy improved oral health and a more youthful appearance. Additionally, All-on-4 provides an easier maintenance routine, just brush and floss like you would with natural teeth.
They are designed to last many years with proper care, often longer than traditional dentures.
Who Is an Ideal Candidate
If you have lost most or all teeth in one or both jaws, or if your current dentures are loose and uncomfortable, All-on-4 implants could be a good option for you. Candidates should have good overall health and healthy gums, as these affect how well implants heal.
People with low jawbone density might still qualify because the All-on-4 system uses angled implants to maximize bone use, often avoiding bone graft surgery. However, severe gum disease or other oral infections may prevent you from being a candidate until those issues are treated.
A qualified oral surgeon will review your medical history, check your bone structure, and create a personalized treatment plan to see if All-on-4 dental implants fit your needs.
Find out whether All-on-4 dental implants are right for you by contacting Briggs Family Dental in New Market, VA, for a personalized consultation.
Step 1: Initial Consultation and Customized Treatment Plan
Your All on 4 journey begins with a detailed visit where the dentist learns about your oral health and goals. This step involves careful checks and modern scans to understand your jawbone and bite.
The dentist then uses this information to create a personalized plan just for you.
Comprehensive Oral Evaluation
During your first appointment, your dentist will examine your mouth closely. They will check your gums, remaining teeth, and overall oral health to spot any issues that could affect the implant process.
This exam ensures they understand the condition of your mouth before moving forward. Your medical and dental history will also be reviewed.
This helps identify any health conditions or medications that might impact healing or implant success. Expect a discussion about your goals, such as what you want to improve in your smile and bite.
Your feedback is important here.
3D Imaging and Digital Impressions
Next, your dentist will use 3D imaging technology, such as CBCT scans, to create a detailed picture of your jawbone. These images show bone density, size, and the exact locations of nerves and sinuses.
Knowing this helps the dentist plan where the implants will go safely and effectively. Digital impressions are taken to capture the shape of your mouth without messy molds.
These impressions are more accurate and comfortable for you. They also let the dental lab start designing your custom teeth right away.
This step saves time and makes your final smile fit better.
Planning Implant Placement
With your exam and scans complete, the dentist creates your customized treatment plan. They decide the best spots to place the four implants based on your jawbone’s density and shape.
Proper placement is key to making sure your new teeth are strong and stable. The plan also considers your bite alignment to ensure your new teeth work well with your jaw movements.
This avoids problems like uneven wear or discomfort later. You’ll discuss the plan with your dentist so you know exactly what to expect during your procedure.
Step 2: Preparing for the Procedure
Getting ready for your all on 4 dental implant procedure means following clear steps to ensure your body and mouth are in the best condition. You’ll need to pay attention to health checks, how your gums and bones are doing, and how the dental team will manage your comfort during surgery.
Pre-Procedure Instructions
Before your surgery, you’ll receive specific instructions to help reduce risks and make the process smoother. This typically includes medical clearance from your doctor, especially if you have chronic conditions like diabetes or heart issues.
You might need to adjust or pause certain medications like blood thinners. Your dentist will also advise you on maintaining excellent oral hygiene.
Brushing and flossing thoroughly are important to lower the chance of infection. You’ll be asked to follow dietary guidelines, such as fasting before surgery if sedation is planned.
Arranging transportation is important because you may feel drowsy after sedation. Have soft foods ready for recovery, like smoothies or soups, to ease eating once your mouth starts healing.
Local Anesthesia and Sedation Options
You won’t feel pain during the procedure thanks to local anesthesia that numbs your mouth. It’s commonly combined with sedation to keep you calm and comfortable.
Sedation options range from light (like nitrous oxide) to deeper methods (like IV sedation), depending on your anxiety level and the complexity of the surgery. Discuss your preferences and medical history with your dentist.
They will choose the safest and most effective option for you. The goal is to keep you relaxed without losing the ability to recover quickly once the procedure ends.
After anesthesia and sedation wear off, you might experience some grogginess. That’s why having someone drive you home is important.
Addressing Bone and Gum Health
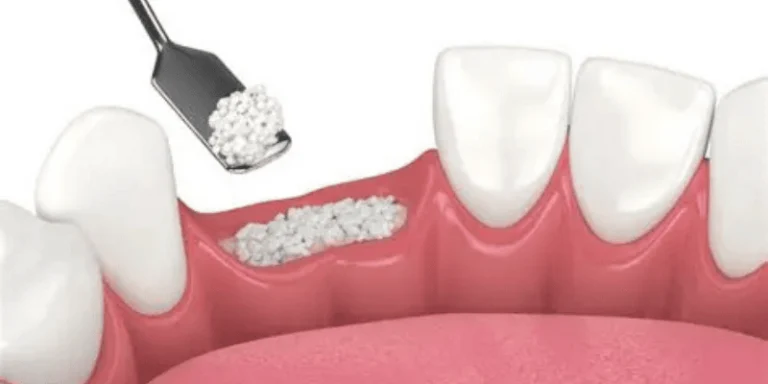
Good bone and gum health is key to long-term success with your implants. If your jawbone isn’t dense or thick enough, your dentist might recommend bone grafting before the implant surgery.
Bone grafts add extra bone material to strengthen weak areas, helping your implants stay stable. Your gums also need to be healthy.
If you have gum disease or infections, these must be treated first. Inflammation or infection can harm healing and increase the risk of implant failure.
Restorative dentistry techniques might be used to prepare your mouth. This ensures a strong foundation for implants and a stable final result.
Your dental team will carefully check your mouth and plan any extra steps before the implant placement.
Step 3: Implant Placement Surgery

This part of your All-on-4 dental implants procedure involves carefully inserting titanium implants into your jawbone to support your new smile. You’ll learn how your implants are placed, why their position matters, and how you will receive temporary teeth right after surgery to help you eat and speak comfortably.
Implant Placement Technique
During surgery, your oral surgeon will place four titanium implants into your jaw. These implants act like roots for your new teeth.
The implants are carefully inserted at specific angles to make the most of your existing bone, often avoiding the need for bone grafting. The procedure is done under anesthesia, so you won’t feel pain.
Your surgeon makes small openings in your gums to place the implants directly into the bone. After placing the implants, they will be checked for stability.
This ensures your implants are secure enough to support your new teeth while they heal. The goal is to create a strong base for your future smile.
Strategic Positioning of Titanium Implants
Your implants aren’t just placed randomly. The All-on-4 technique uses a special pattern for positioning.
Two implants are placed vertically in the front of your jaw, where the bone tends to be strongest. The other two implants are set at an angle toward the back.
This helps increase support and makes use of more bone without extra surgery. This strategic positioning gives your new teeth a better anchor.
It also reduces treatment time and keeps your recovery as easy as possible. Proper implant placement is key to the long-term success of your dental implants.
Immediate Temporary Prosthesis
Right after placing the implants, your dentist will attach a temporary set of teeth. This temporary prosthesis allows you to leave the office with a full smile.
These temporary teeth are designed to look natural and help you eat soft foods. They also protect your implants and gums during the healing period.
While your jawbone fuses with the implants over 3 to 4 months, these temporary prosthetic teeth keep you comfortable and confident. Once healing is complete, the temporary teeth will be replaced with your custom, permanent smile.
Contact Briggs Family Dental in New Market, VA, to learn how same-day temporary teeth support comfort and function during All-on-4 healing.
Step 4: Healing, Osseointegration, and Follow-Up
After your implant surgery, your body needs time to securely join the implants to your jawbone. This stage is key for stability and success.
You’ll also visit your dentist regularly to check on healing and make sure everything is on track.
Osseointegration Healing Process
Osseointegration is when your jawbone grows around the implants, locking them in place. This process usually takes about 3 to 4 months but can vary depending on your health.
During this time, it’s important to avoid putting too much pressure on the implants to help them bond properly. You’ll need to follow specific care instructions like eating soft foods, keeping the area clean, and avoiding smoking.
Your temporary teeth will help you maintain a good appearance and function, but they are not as strong as your final restoration. This healing phase creates a strong base for your permanent teeth.
Follow-Up Appointments and Progress Checks
Your dentist will schedule follow-up visits to monitor how well your implants are healing. These appointments help catch any issues early, like infection or implant movement.
They usually happen a few days after surgery, then a few weeks later, and continue until your implants fully integrate. During these visits, your dentist will assess your mouth, clean around the implants, and may take X-rays to track bone growth.
They’ll also guide you on oral hygiene and habits to protect your new implants. Keeping these appointments ensures your treatment stays on track and your smile heals properly.
It’s a chance for you to ask questions and get support as you adjust to your dental restoration.
Step 5: Final Restoration and Smile Transformation

This step completes your All-on-4 dental implants procedure by placing your permanent teeth and making sure everything fits and looks just right. It’s about getting your new smile to feel natural and work perfectly for you.
Long-term clinical studies show that full-arch implant systems, including All-on-4, achieve 2–5 year survival rates above 98%, supporting their durability, bite stability, and long-term function when proper aftercare is followed.
Fitting the Permanent Prosthetic Teeth
Once your implants have fully healed and bonded to your jawbone, it’s time to fit the permanent prosthetic teeth. These teeth are custom-made to match the shape, size, and color that suit your face and smile best.
During fitting, your dentist will carefully attach the full arch restoration to the four implants. This prosthesis is fixed in place, meaning you won’t have to remove it daily.
The secure fit allows you to eat, speak, and smile comfortably without worry. If needed, small adjustments are made to ensure the teeth don’t feel too tight or loose.
Your dentist will make sure the new teeth blend well with your gums and feel strong and stable.
Ensuring Proper Bite Alignment and Aesthetics
Getting your bite right is key after the final restoration. Proper bite alignment means your top and bottom teeth meet evenly when you close your mouth, which helps you chew food easily and avoid jaw pain.
Your dentist will check how your new teeth fit together and adjust them as needed. This might include reshaping parts of the prosthesis to prevent any uncomfortable pressure points.
They’ll also make sure your smile looks balanced and natural, paying attention to details like tooth position and how much gum shows.
A well-aligned bite helps protect your implants and natural jawbone. It also makes talking and smiling feel normal again.
Aftercare and Long-Term Maintenance
Taking good care of your All on 4 implants helps them last and keeps your mouth healthy. You’ll spend time on daily cleaning, follow specific food choices when healing, and use special tools to clean around your implants properly.
Daily Oral Hygiene Habits
You need to clean your implants twice a day to stop plaque buildup and avoid infection. Use a soft-bristled toothbrush and brush gently for about two minutes.
Focus on all surfaces of your prosthetic teeth and the gums around them. Flossing is crucial but tricky with All on 4.
Use floss threaders or special implant floss to reach under the prosthesis where food and bacteria can hide. A water flosser is also great for flushing out debris and reducing bacteria around the implants.
Don’t forget to gently massage your gums with a rubber-tip stimulator if recommended. This helps improve blood flow, which supports healing and keeps your gums healthy.
Soft Diet and Dietary Recommendations
After surgery, stick to a soft diet to avoid putting too much pressure on your new implants. Foods like yogurt, mashed potatoes, scrambled eggs, and smoothies are good choices.
Avoid hard, crunchy, or sticky foods like nuts, chips, or caramel, as they can damage your prosthesis or irritate your gums. Cut tough foods into small pieces to make chewing easier and reduce stress on your implants.
Limit foods and drinks that stain your prosthetic teeth, such as coffee, tea, red wine, and tobacco. Staying hydrated helps keep your mouth tissues healthy, so drink plenty of water throughout the day.
Gradually you can introduce firmer foods as your mouth heals and your dentist approves.
Tools for Cleaning Around Implants
Using the right tools makes a big difference in caring for your All on 4 implants. Beyond a soft-bristled toothbrush, interdental brushes are essential.
These small cone-shaped brushes clean the spaces between your gums and prosthesis where a regular toothbrush can’t reach. A water flosser is highly recommended.
It uses a gentle stream of water to remove food particles and bacteria from hard-to-access areas under the prosthesis and around the implants. Set it to medium pressure to avoid gum irritation.
Avoid abrasive products and hard-bristled brushes, as they can scratch your prosthetic teeth and cause damage. Choose alcohol-free, non-abrasive toothpaste and mouth rinses designed for implants or recommended by your dentist.
Schedule a visit with Briggs Family Dental in New Market, VA, to review the right cleaning methods and products for your All-on-4 implants.
Frequently Asked Questions
Getting All-on-4 dental implants involves several specific steps, from initial tests to surgery and recovery. You’ll also want to know how long the process takes, what to expect during healing, and how to care for your new teeth.
What are the initial steps involved in getting All-on-4 dental implants?
Your journey starts with a thorough consultation. During this visit, your dentist will check your oral health, take X-rays or 3D scans, and review your medical history.
Next, a personalized treatment plan is made based on your bone structure and dental needs. If you have any teeth that need removal or gum issues, those will be treated before surgery.
How long does the All-on-4 procedure typically take from start to finish?
The implant surgery itself usually takes a few hours in one visit. You will often get temporary teeth placed right after surgery.
Healing, including bone integration with the implants, takes about 3 to 6 months. After that, your permanent teeth will be attached.
Can you explain the recovery process after All-on-4 implant surgery?
In the first days after surgery, you might feel some swelling or mild discomfort. Your dentist will give you instructions on pain management and oral care.
You’ll need to follow a soft diet for several weeks to avoid stressing the new implants. Regular check-ups help track healing and address any issues early.
What kind of maintenance is required for All-on-4 dental implants?
Good oral hygiene is key. You should brush as usual, but you may also need special tools to clean around the implants.
Regular dental visits are important to monitor the implants and the health of your gums. Your dentist might recommend professional cleanings and occasional adjustments.
Are there any dietary restrictions to follow post All-on-4 implant procedure?
Yes, right after surgery, sticking to soft foods is necessary. Avoid hard, chewy, or sticky foods that could affect healing.
Gradually, you can return to your regular diet as your implants heal, usually within a few months.
What should patients expect during the transition to temporary teeth with All-on-4 implants?
After your implants are placed, you will receive temporary teeth that look natural. These allow you to eat and speak comfortably.
These temporary teeth help protect your mouth during healing. They’re designed to be functional but will be replaced by permanent teeth once your implants fully integrate with your jawbone.